梦小慀资源网
截图预览
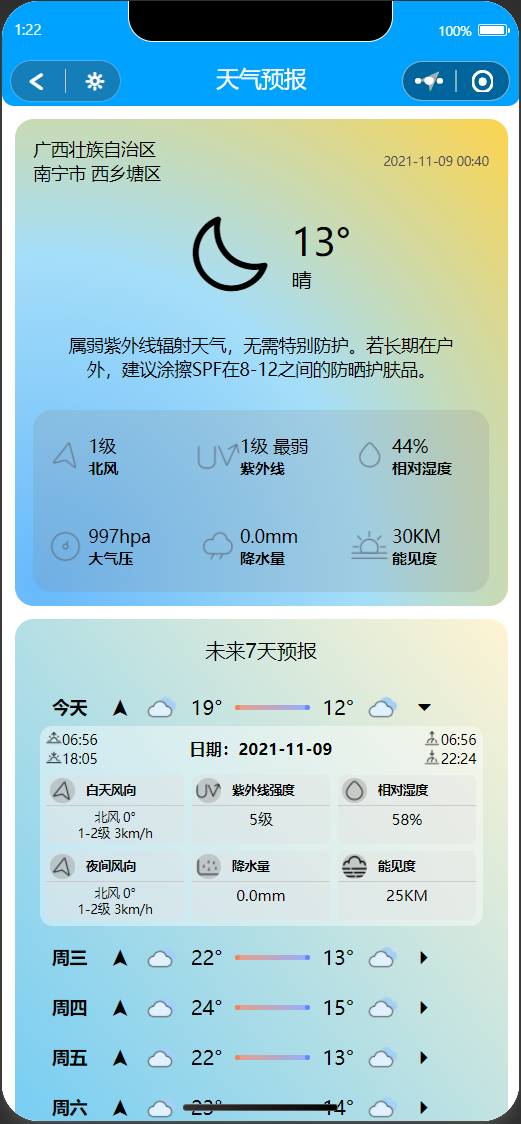
一、前言展示
最近开发小程序发现需要植入一个天气系统,在网上找了好久实例,发现很多都是不太好看的,或者发不出来的也用不了,最后我只能自己动手写出来的一个页面,现在分享出来给大家,希望能给到你们帮助!
二、前期准备
- 自己申请微信小程序
- 需要的接口:
天气接口:和风天气API接口
位置信息:腾讯地图接口
注意:接口需要大家自行去申请,不懂百度都有,这里我就不细说了! - 小程序配置合法域名
https://apis.map.qq.com
https://devapi.qweather.com
三、部分代码展示
引入腾讯地图js文件
var QQMapWX = require('../../utils/qqmap/qqmap-wx-jssdk.js');
js页面初始数据
data:{
weekday: ['周日', '周一', '周二', '周三', '周四', '周五', '周六'],
showday: [],
}
获取位置授权信息
/* 获取用户位置授权信息 */
autoUserLocation() {
let that = this;
wx.getSetting({
success(res) {
if (!res.authSetting['scope.userLocation']) {
console.log('位置未授权')
wx.setStorageSync('isLocation', false);
wx.authorize({
scope: 'scope.userLocation',
success(res) {
that.handleLoacation();
},
fail(res) {
console.log('~~取消位置授权~~')
wx.setStorageSync('isLocation', false);
wx.showModal({
title: '定位失败',
content: '请允许“使用我的地理位置”后,再查看定位城市信息,否则无法获取到你的当前位置!',
success(res) {
if (res.cancel) {
that.setData({
OpenWeather: false,
showerror: "block"
})
wx.showToast({
title: '您已拒绝授权',
icon: 'error',
duration: 2000
})
} else if (res.confirm) {
wx.openSetting({
success: dataAu => {
if (dataAu.authSetting['scope.userLocation'] === true) {
that.setData({
OpenWeather: true
})
wx.showToast({
title: '授权成功',
icon: 'success',
duration: 2000
})
that.handleLoacation();
} else {
that.setData({
OpenWeather: false,
showerror: "block"
})
wx.showToast({
title: '授权失败',
icon: 'error',
duration: 2000
})
}
}
})
}
}
})
}
})
} else {
that.setData({
OpenWeather: true
})
console.log('位置已授权')
that.handleLoacation();
}
}
})
},
获取当前经纬度
// 获取当前位置经纬度
handleLoacation() {
let that = this;
wx.getLocation({
type: 'gcj02',
success(res) {
that.setData({
latitude: res.latitude,
longitude: res.longitude,
}),
that.getRealTimeWeahter(res.latitude, res.longitude);
that.getWeahterIndices(res.latitude, res.longitude);
that.getWeahterPrediction(res.latitude, res.longitude);
},
fail: err => {
wx.showModal({
title: '获取地理位置失败',
content: '请在系统设置中打开定位服务,重新进入小程序!'
})
}
})
},
获取实时天气
//实时天气
getRealTimeWeahter: function (latitude, longitude) {
var that = this
var url = "https://devapi.qweather.com/v7/weather/now"
var params = {
location: longitude + "," + latitude,
key: "和风天气接口KEY",
}
wx.request({
url: url,
data: params,
success(res) {
var str = res.data.now.obsTime;
var s = str.indexOf('T');
var i = str.substring(s + 1);
var y = i.indexOf('+');
var date = str.substring(0, s);
var time = i.substring(0, y);
that.setData({
now: res.data.now,
obsTime: date + ' ' + time,
})
app.globalData.isNow = res.data.now;
console.log(that.data.now)
},
fail(res) { },
complete(res) { },
})
},
获取未来天气
//未来天气预报
getWeahterPrediction: function (latitude, longitude) {
var that = this
var url = "https://devapi.qweather.com/v7/weather/3d"
var params = {
location: longitude + "," + latitude,
key: "和风天气接口KEY",
}
wx.request({
url: url,
data: params,
success(res) {
console.log(res)
let dailyData = res.data.daily
that.setData({
WeahterPredictionList: dailyData
})
dailyData.forEach(function (item, index) {
var date = new Date();
var currect = "WeahterPredictionList[" + index + "].isOpen"
var showday = "WeahterPredictionList[" + index + "].week"
if (index == "0") {
that.setData({
[showday]: "今天"
})
} else {
that.setData({
[showday]: that.data.weekday[(date.getDay() + index) % 7]
})
}
that.setData({
[currect]: false
})
console.log(item, index)
})
},
fail(res) { },
complete(res) { },
})
},
fail(res) { console.log("判断接口出错,未知问题:" + res) },
});
},
四、结束语
今日教程到此结束了,以上配置均为默认,不明白可以留言或者私信询问我
教程与源码也会持续更新到公众号与小程序
欢迎关注我们的小程序:梦小慀

欢迎关注我们的公众号:梦咖哔哔